//Home
What I learned about Software Defined Radios in a few days…
General | Deron Grzetich | 14. July, 2020
As usual, it has been quite a while since I’ve posted anything to the site, but I figured since I spent some time learning about Software Defined Radios (now that I finally got a bit of down time from work) that I’d share what I learned. One caveat, I did have a purpose in learning more about SDRs and that was to be able to listen to and record all the Chicago Police and Fire dispatch radio traffic on the old analog radio system. After a bit of trial and error and testing a few of the hardware and software options I settled on a working configuration that I’ll share in the video series below.
Background
SDRs are hardware devices, controlled by software and the configuration of that software, that allow us to use the radio hardware to tune to and receive radio transmissions, and in some case transmit radio as well, within the spectrum covered by the hardware device. These devices range from $25 on the low end to $1,000’s on the upper end, and in this post I’ll mainly focus on the lower end devices (RTL-SDR and Nooelec SMART NESDRs). The links to the hardware, software, and other sites mentioned in the video series are posted below for reference.
Objectives
The objective, as mentioned above, was to be able to receive and record radio transmissions. These transmissions happen to be in the 460 MHz range (from 460.025 to 460.525 MHz) as Chicago is still using an old analog radio system for dispatch (yes, SWAT and other have moved to a digital encrypted system already). The issue I ran into was there is a lot of information on how to setup and configure a digital, or digitally trunked system, but not a lot on how to setup the hardware and software for older analog radio systems. Turns out, it is not that difficult…
The Videos
I figured this post was better suited for a series of videos that cover the basics of the radio spectrum through the installation and configuration of hardware and software to meet my objectives. Starting with the basics, Video 1 below covers:
- The basics of the radio spectrum in the US
- An overview of my use case and objectives
- Sites that can be used to lookup radio frequencies
- Hardware options (handheld scanners) and types of radio systems (analog, digital, and trunked)
In Video 2, I’ll cover:
- SDR Hardware options (limiting to $350 and under)
- Software options
- The hardware and software I chose for my use case
- Where can I stream these transmissions? OpenMhz!
Video 3 gets us started on the build, and covers:
- Connecting our SDRs to Windows and Linux
- Using SDR#
- Installing rtl_eeprom, docker, and getting trunk-recorder to a working state
Finally, in Video 4, we work on:
- Determining your error correction or PPM using GQRX
- Configuring trunk-recorder (config.json and talkgroup files)
- Determining a center frequency for our use case (analog 460 Mhz transmissions)
- Pushing our recordings to OpenMHz and listening locally
And one final bonus video that shows the quick and dirty way to get trunk-recorder working using a pull from Docker Hub of the latest robotastic/trunk-recorder docker. In this we will use docker -run and map some volumes and devices between our OS and the Docker container and get up and running quickly.
Finally, here are the links:
- https://www.rtl-sdr.com/
- https://www.nooelec.com/store/
- https://airspy.com/
- https://shop.hak5.org/collections/featured-makers/products/hackrf
- https://www.andrewmohawk.com/2020/06/12/trunked-radio-a-guide/
- https://github.com/robotastic/trunk-recorder
- https://github.com/AndrewMohawk/trunkrecorder-helpers
- https://www.radioreference.com/
- https://openmhz.com/
Hurry! Everyone add “1” or “!” to the end of your 8-character passwords now!
General | Deron Grzetich | 15. February, 2019

Seeing all the “your 8-character passwords are dead!” posts and articles gave me a good laugh as that’s already been the case. We have been down to reasonable offline cracking times even with modest hardware investments for a while now. There are also several caveats to saying that an 8-character password is dead, but I’ll get to that later in the post. For those wondering, most all of these posts were spurred by a recent announcement by hashcat that a tuned version of 6.0 had achieved 100GH/s NTLM speeds using a single Nvidia GeForce RTX 2080Ti (https://twitter.com/hashcat/status/1095807014079512579). Some news sources keep saying “8 cards” but that’s not the case as they show only a single card in the 100GH/s benchmark. Besides, my meager 6 x GTX 1060 cracking rig at home already achieves 120GH/s for NTLM and given the advancements in GPU technology I’m not surprised by the benchmark speeds of the RTX 2080Ti.
But let’s take a step back for a second and detail how that 8-character NTLM password hash was already crackable prior to this new hashcat benchmark and GPU release from Nvidia. Our goal in the following example is to see how long it takes to offline brute-force an 8-character NTLM hash. We’ll assume you have a set of different budgets just to give a sense of the spend required to achieve certain cracking times:
- Scenario 1 – We have old hardware laying around that we purchased long ago – I’m using this as an example to show how rapidly the cracking times have dropped – so let’s say this is a single GTX 960 card capable of 10GH/s speeds on NTLM hashes (circa 2015).
- Scenario 2 – You have a budget of ~$3,500 with which you could easily buy a smaller GPU cracking rig that has 6 GTX 1060 cards on which to run hashcat and you’d get to 120GH/s speeds on NTLM hashes.
- Scenario 3 – You have a budget that is double, or ~$7,000, which would get you 8 GTX 1080 cards and speeds of 350GH/s on NTLM hashes.
- Scenario 4 – You don’t want to buy hardware, so find that the p3.16xlarge EC2 instance on Amazon AWS fits your needs as it has 8 Nvidia Tesla V100 GPUs available for $25/hr. and is able to reach 633GH/s NTLM speeds.
- Scenario 5 – You have a budget of ~$12,000 in which nets you 8 RTX 2080Ti cards and speeds of 800GH/s for NTLM hashes.
Next, we need to look at total keyspace of our password. Ignoring that many people choose repeatable or known patterns when selecting and updating or changing their passwords (see: http://www.malos-ojos.com/?p=771), and assuming that we need to brute-force the entire keyspace (we’re really unlucky and only match on the last and final combination), we can calculate maximum cracking time for any 8-character password based on the time it takes (at our guessing rate) to exhaust the keyspace. Assuming there are 95 possible characters (upper alpha, lower alpha, numeric, special characters, etc. – the “ascii-32-95” set) and a password length of 8, we have:
- A keyspace of 95^8, or 6,634,204,312,890,625 possible combinations.
Those who started in security when we used CPUs to crack would recognize that keyspace as an almost insurmountable task and we’d be discussing how many “2 to the power of something” years it would take to crack. Also, while I gave up on rainbow table years ago, writing this made me question if anyone has even bothered to generate NTLM 8-character “ascii-32-95” tables (the 8 char NTLM mixed-alpha + numeric tables are ~127GB) as I have never seen them, publicly traded at least.
But I digress, so let’s see how our scenarios above play out and determine maximum cracking time:
- Scenario 1 – 663420 seconds = 11057 minutes = 184 hours = 7 days 16 hours
- Scenario 2 – 55,285 seconds = 921 minutes = 15 hours 24 minutes
- Scenario 3 – 18,954 seconds = 315 minutes = 5 hours 15 minutes
- Scenario 4 – 10,480 seconds = 174 minutes = 2 hours 54 minutes
- Scenario 5 – 8,292 seconds = 138 minutes = 2 hours 18 minutes
From these results we see that even with a limited budget of ~$3,500 that we need less than a day to crack a hash (remember, that is a maximum length) that previously, using CPUs, would take years. If we assume on average that we need to exhaust 50% of the keyspace before a match then these times drop by half, meaning we should be cracking hashes in ~7.5 hours on that same $3,500 system.
What I find interesting about Scenario 4 is that although you have no upfront hardware costs you quickly exhaust your funds if you have a large number of hashes to crack. As an example, if you cracked 160 NTLM hashes, again assuming worst case scenario where we need to exhaust our keyspace, we would have hit the $12,000 mark in fees and could have simply purchased our own hardware for the job. Speaking of costs – one interesting thing to note is the cost per GH/s of cracking speed as it goes down the higher your budget. At $3,500 you’re paying $30 per GH/s and at $12,000 you’re paying half, at $15 per GH/s. Seems counterintuitive, but the more you spend the less it costs per unit of GH/s.
Finally, as I was reading the articles, news reports, and tweets about this topic I noticed a few mis-conceptions or discussion points that have popped up that I’d like to address here:
- Why all the buzz around password lengths of 8 characters and where did that recommendation come from?
It comes from a variety of sources, one of which is NIST guidance. And while there are sites and services that allow you to use less than 8 (see this: https://www.troyhunt.com/how-long-is-long-enough-minimum-password-lengths-by-the-worlds-top-sites/), most corporate environments will default to the recommended minimum length of 8 in their password policies. However, that guidance may have been (read: is) based on dated information, thinking back to CPU-based cracking and much slower rates, which meant that an offline attack against an NTLM hash would not be successful and because we have maximum password ages and rotation requirements it isn’t an issue…but it is, and has been for some time. Even PCI requirement 8.2.3 states a requirement for a minimum 7-character password length, which significantly reduces the keyspace we have to cover in brute-force attacks.
- But my company requires me to rotate my password every 30/60/90/X days, so we should be good, right?
Not really, if the numbers above hold and I can break your NTLM hash in under 3 hours, unless I’m very unlucky and the time between obtaining the hashes and cracking them offline plus the 3 hours of cracking times coincides with the same day you either manually rotate your password (unlikely) or are forced to by the system (more likely) then I have access for at least 1 to as many days in your maximum password age policy. If my goal is to log in as you and download your mailbox as an offline .pst then I’ll probably be successful.
- What about password complexity – doesn’t that help?
Not really, but sort of. In my scenarios and brute-forcing time calculations above I accounted for all 95 characters, which would include your special character requirement. Not to mention, you likely have a password that conforms to a well-known standard (see: http://www.malos-ojos.com/?p=771), which means I can use rules and wordlists to more effectively crack the hash and could more effectively attack your hash. In fact, if you kept the 8-character length requirement but ditched the complexity requirement (assume mixed-alpha numeric only) I could crack your password (in the best case above) in 4.5 minutes as opposed to 2 hours and 15 minutes). So yes, I say sort of as it increases the keyspace and increases brute-force time – but also not really considering your special characters either start or end your password which is a pronounceable root word or words.
- Why the focus on NTLM hashes? Does the hash type matter?
Hash type absolutely matters – ask an old security professional about LM hashing and they will regale you with stories of the olden days and rainbow tables and domain admin access every time. If you look at NTLM, which is an MD4 hash of the plaintext password, it is a very fast algorithm. Meaning it is fast to calculate and makes it more susceptible to brute-forcing as you’re allowing me to test more (higher rates) plaintext inputs to match the MD4 hash output. I also focus on NTLM (-m 1000 for the hashcat crowd) as that is the default storage mechanism in Microsoft Active Directory.
That being said, NTLM isn’t the only hash type out there…and no, we don’t need MD4 to be as fast as it is for password storage or authentication. Which brings us to other ways in which we can store based on passphrase-based key derivation functions such as PBKDF2 (https://en.wikipedia.org/wiki/PBKDF2) which isn’t very GPU resistant but obviously better that MD4, and algorithms such as bcrypt, scrypt, and now Argon2 (https://en.wikipedia.org/wiki/Argon2). As an example of the slow down in brute-forcing, a single GTX 1060 can do 19 billion MD4 calculations per section versus only 240,000 per second for scrypt.
- Does this mean you can use these GPU cracking rigs against websites?
No, and that’s the difference between online and offline attacks. What I’m covering here are offline attacks, meaning the attacker has the hash in their possession and can attempt to recover the password/crack the hash on their own system. This usually occurs if the organization has been breached, someone has gained admin access to a system or the domain, and has “dumped” the password hashes (or captured them in transit across the network). Online attacks would require a different toolset and would operate at much slower speeds/rates.
But this brings me to a different point, as we gain cracking rate speed it also means those password hashes dumped on the internet become even more susceptible to cracking, depending as stated above on the hashing algorithm used. Then again, we already know the general format of the password and that many web services allow 6-7 character non-complex passwords, and while many have obviously fallen because of this I’m speaking of the more complex passwords that have not, until now.
- Anything you haven’t covered?
A lot, and I mean A LOT! We haven’t even touched FPGA and ASICS here, precomputation, side channel attacks, and a whole lot of other stuff related to password storage, hashing, and cracking…and I stuck with unsalted password hash storage versus network authentication algorithms for simplicity.
GE Concord 4 Home Security System – Resetting the Installer Code
General | Deron Grzetich | 2. November, 2017
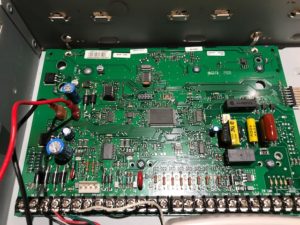
Somewhat off the infosec path, but I recently found a need to break into a GE Concord 4 home security system recently – yes, the commercial/home alarm system with door, glass break, and motion sensors that calls the company monitoring your system when the alarm is tripped. While my home alarm system has since been replaced with a newer model, the GE Concord 4 system was installed when I purchased my home, and I thought a consolidated set if instructions and details may help someone who also needs this information. My main goal was to gain access to mess around with this system and at some point sell it to someone who needs a replacement board. To be honest, the Concord 4 is overkill for single family homes as it supports 96 zones total (wired plus RF – comes with 8 zones on the standard board), 6 partitions, and 230 user codes…more than anyone could possibly need.
One thing you’ll notice when home security systems are installed is that the original installer, or the dealer, sets the install codes on your system. You’ll need these codes should you need to change system-wide settings such as the central station (CS) number (the phone number your alarm system calls when tripped) and the system ID that let’s the monitoring center know which system is calling with an alarm. These aren’t the same as user codes or the master code – which are used to arm and disarm the system on a daily basis – but the codes required to really program the system. If you’re lucky enough to have a new system installed while you’re around always ask for the installer codes and store them some place safe. One other caveat, as you’ll see below, is that not all alarm keypads can program a system and that applies to the Concord 4 as well.
The Basics:
- The system we are dealing with is a GE Concord 4 – GE Home Security was purchased by Interlogix – previously there was a Concord 3 and Concord Express, and while there isn’t much difference in these models I can’t guarantee these instructions will work for other models.
- You’ll also need a keypad that is capable of programming the Concord 4. I was lucky in that I have the keypad models (SuperBus 2000 2×16 LCD) that can program this board. In some cases, installers may only install touchpad models that can’t program the board throughout your house, and in that case you’ll also need to head over to eBay and find a new touchpad as well. As an alternative, and if you’re simply attempting to switching monitoring companies, the installer may have one of the required programming keypads. Although you’ll need the installer codes (which is the point of this post) to gain access to reprogram the system.
- You’re also going to need a copy of the installer manual – not the user manual you get that describes daily operation of the system – the installer manual can be found here
The eeprom:
These boards have a removable eeprom that holds the codes and settings for the board. To get the installer codes you have a few options. You could:
- Attempt to use the default codes – usual suspects here are 4321 (default), 1234, 1111, 4112, 6321 (that’s one ADT was known to use), and 0602 (SCM monitoring used this as a default)
- Buy a new board with an eeprom configured with a default installer code (4321), or a known installer code (verify with the seller)
- Use the methods below to read the installer codes from the eeprom and then reconfigure your board – this post assumes you’re going with option 3…
Finding and removing the eeprom:
The board and eeprom (show in the pictures below) is where we’ll start. The eeprom on the Concord 4 should be a Microchip 24LC256
 ‘
‘
Power the system down by removing the AC connection from the wall (or remove the power leads from the screw terminals on the leftmost side of the board, GND and Positive for the 16.5V AC transformer), and then remove the power leads from the battery or board (red and black connection in the picture below) to remove battery backup power to the board. Use a chip puller to extract the eeprom from the socket, being careful not to bend any pins. Note the orientation of the chip, with the notch towards the “top” of the board and away from the screw terminals used to connect sensors, power, and other items to the board. You’ll replace it in that same orientation prior to reconnecting power.
Reading the eeprom:
To read the eeprom you’re going to need an eeprom reader. I used this one – from Amazon, ~$10 – (see image below)
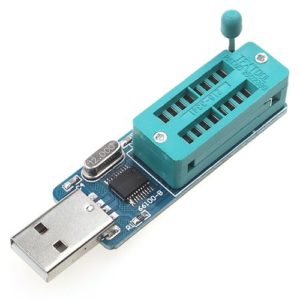
The issue you’ll find with this reader is that it does NOT come with any software and only works with Windows 7 as the operating system. Luckily I had an older laptop that I could use for this task, if you don’t you could try a Windows 7 VM but I’m not sure the USB translation between host and guest will work for our needs here. Assuming you have this device and a Windows 7 system, here are the steps to get the reader software working:
- Download the USB device driver and eeprom reader/writer software
- Unzip into a directory of your choosing – create a new folder in the directory called Languages and move the english.ini file into the Languages folder
- Plug in the eeprom reader – without the eeprom chip inserted – cancel the autodriver install
- Run the driver-24cxx25xx.exe driver installer, choose install, and your system should now recognize the eeprom reader
- Run the eeprom software with the USB reader/writer inserted (again, without the eeprom from the board inserted) – it is called CH341A.exe
- In the lower left corner of the application window it should say “connected”
Now it is time to take the eerpom from our board and insert it into the USB reader/writer. This is the most confusing part as the diagram in the application, as well as other reader/writer tutorials show various orientation of the chip. What DOES work with the reader is putting the the notch (or dot) of the eeprom in the socket closest to the USB connection and with the notch facing the USB connection. If you reverse this you’ll burn up the eeprom chip – or your fingers. If you use the socket furthest away from the USB connection the chip can’t be read.
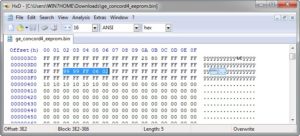
Unplug the USB reader/writer from your system, using the correct orientation place the chip in the socket and move the lever at the end opposite the USB connection down to make contact with the 8 eeprom pins. With the CH341A application running, plug the USB reader/writer back into your system. Once it shows as connected, make sure you choose 24 eeprom as the type, Microchip as the manufacturer, and MI24LC256 as the name. Hit the READ button – not erase, program, or anything else as we are not modifying the contents of the eeprom, only reading the values we need. If your output is all FF’s you’ve done something wrong as those are null hex values. If you see different hex values (besides FF’s) as you scroll the output then you’ve likely read the chip correctly.
The values we need are in the following locations:
- Main code – used to arm/disarm the system is at 0x03E2-3 (in my shot below it was reset to 9999)
- Installer code – what we are after, is at 0x03E5-6 (in my case it was set to 0602 by the installer)
Resetting the installer code/or programming the system:
With the installer code in hand, we can use our keypad to enter SYSTEM PROGRAMMING. You’ll need to reinsert the eeprom (notch up), reapply the battery power and reconnect AC power to the board. After system power up, you will do the following:
On the keypad, enter 8 + installer code (0602 in my example) and then 0 + 0 – the keypad should say SYSTEM PROGRAMMING (see below)

If you get a quick two-beeps and a return to the time/date screen then either your installer code is not correct, or your keypad is not capable of programming the system (see above). Assuming you made it this far, you can either continue using the known installer code, or reset it. Use the installer manual, starting at page 33, the instructions are pretty clear – under System -> Security we can view and change the installer codes as necessary. Reminder, the default on these boards is 4321 for the installer and a blank dealer code.
Hope that helps! Please note – I’m not actively monitoring this post for questions or comments.
Getting Kali 2.0 Running on a Raspberry Pi 2 Model B
General | Deron Grzetich | 5. September, 2015
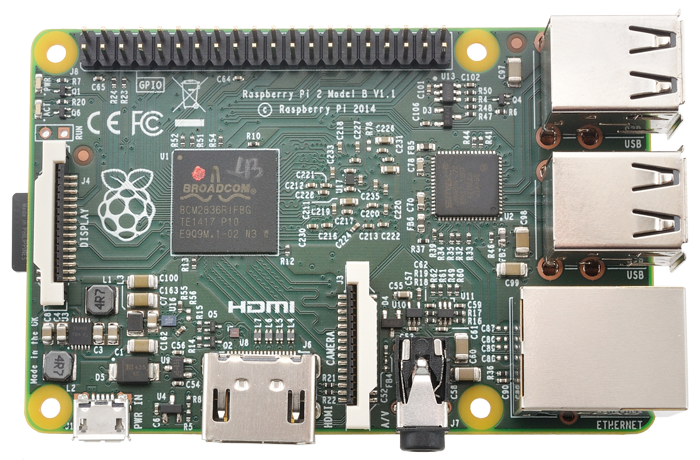

This post will walk you through getting Kali 2.0 installed on a Raspberry Pi 2 Model B. I’ve chosen the latest version of the Pi due to the fact that it has an quad-core 900MHz ARM Cortex-A7 processor and 1Gb of memory in addition to the 4 on-board USB ports, HDMI, and wired Ethernet all in the same form-factor as the previous models. Being new to a Linux distro is one thing, fighting through dependencies and learning how to navigate and operate the system, and throwing a new hardware platform on top may be a barrier to entry for some. While these videos do not show you everything they do get you to a working Kali 2.0 image with remote access. The motivation for this was to encourage more people to try going this route in this quarter’s run of CNS388/488 at DePaul. The videos below are broken into different parts as opposed to one long video to allow you to jump to the video instructions that you need.
Before you start you’re obviously going to need some hardware. At a minimum you should have (for reference I listed the products I’m using by link at the end of the post):
- A Raspberry Pi 2 Model B – Generally around $30-40 for the bare card (I found a $30 deal at Micro Center this past week for the Pi 2 Model B)
- A Case – Unless you are protecting the board in some other way
- A MicroSD card – Look for Class 10 cards and quality manufacturers if you plan to actually use this build for testing
- MicroSD adapters – Sometimes these come with the cards, but I’ll leave it up to you to find the adapter you need as many of us have these laying around from various digital cameras and such
- A USB-to-flash memory adapter – This isn’t necessary, but helpful if you’re using VMWare and another Linux image to expand the partitions
- HDMI-DVI or HDMI-VGA adapter – Only needed if you want to actually see the output from the Pi and do not have an HDMI input on your monitor
- A wireless keyboard/mouse combo – Again, only needed if you want to interact with the Pi using a monitor
Video 1 – Getting Kali 2.0 flashed on to your MicroSD card
In this video I’ll show you where to get the Kali image from and how to flash it to your SD card. I realize there are many SD flashing programs out there, but I haven’t found one that is as fast as PiFiller for OSX. If you’re using Windows you can search for Win32 Disk Imager and use that, or any other tool capable of flashing the .img file on to the SD card.
Video 2 – Expanding the partitions using gparted
This video expands the root partition of our newly flashed card so that we can install additional Kali tools and meta packages as well as store captured data or files
Video 3 – Installing Kali meta packages and getting SSH & VNC working
In this video we will install Kali meta packages to add additional tools and features to our Kali Pi image. You should note that, depending on your internet speeds, selecting the kali-linux-all package as I have in this video may take a few hours to complete. At the end we will SSH into the image and get a VNC connection established so we can interact with the Kali desktop as well as ditch the external monitor if we choose.
Video 4 – Tunneling our VNC connection through SSH
This video adds some security to our remote connection by tunneling our VNC connection through SSH. This is helpful to both limit the open/listening ports on our Kali image as well as tunnel all VNC traffic through an encrypted SSH tunnel. Note that I’m using a Kali 1.1.0c VM image running on VMWare Fusion as my remote host in most of the videos. The process is different if you use VNCViewer and/or Putty from a Windows system.
Video 5 – Changing SSH from password to public key based authentication
In the final video of this series we change the default SSH keys that were shipped with the Kali 2.0 ARM image as well as generate our our RSA keys to be used for SSH authentication. Finally, we turn off password based auth to SSH so only public key authentication is allowed.
Hope you find these helpful!
My equipment list/links:
What does it take to be successful in the information security field?
General | Deron Grzetich | 19. December, 2014
Normally I’d be posting something related to the Sony hack and why it doesn’t really matter that is was or was not DPRK and asking why everyone is so focused on the destructive malware versus the fact that Sony made many mistakes in the years prior that ultimately led to what we are witnessing in the media today, but I digress…
I’ve been doing this teaching thing for quite some time, 7 and a half years to be exact, and recently went back in time and added up all of the students that have had a course with me…which totals out to just over 800 as of last quarter. I started thinking about not only how I got here but also how my advice and teaching style has changed over these years. In thinking back, the one question that inevitably comes up every quarter in class is “what does it take to be successful in this field?” to which my answers are always almost the same. I’m not basing my answer to this question solely on what I did or how I got to where I am, my answer is based on a combination my own experiences along with traits I’ve observed from others that I’ve worked with throughout my career who I consider to be great security folks in general. I also think there are traits that need to be shed by some folks in our field as well, which I’m also happy to convey to those who ask.
So why am I writing this post? Well, when I first started teaching I attempted to cater to everyone in the class and tried not to offend anyone. Perhaps with age, and after many years of trying to make every student happy, I realized I was doing the students a disservice. I wasn’t exactly treating them in a way that would clue them in on the general expectations of those in our field or in a way that would force them to learn traits that would make them successful. However, and NOT to my surprise, I noted some students just don’t like this new method. Some students just don’t like to be told that they are going to have to work hard, some just don’t like the fact that they may have to research something on their own, and some worry more about the grade than what they take away from the course that they can apply in their current roles or in the future. At the end of every quarter the school asks (used to be mandatory) students to provide course evaluations back to the instructor along with comments on strengths, weaknesses, what they liked, didn’t like and so on. And every quarter I’m both thrilled and dismayed after reading the comments. Of course some people really enjoyed the course, some disliked it, and I expect that…but some disliked it for reasons you wouldn’t think. And what is most dismaying is that some of these reasons fly directly in the face of what I think it takes to be successful in our field…and that worries me.
So what does it take? For me I boiled it down to three main required traits: curiosity, perseverance, being able to learn new things on your own.
Let me start with curiosity – inquisitiveness, interest, and imagination…all synonyms of curiosity. If you don’t find yourself asking “how or why does this work?” very often then you’re probably not curious by nature. Curious people are fascinated by things that generally leads to a burning desire to know why and how things in this world work. Curious people have been known to take things apart (sorry mom) and sort of put them back together. Curious people like to build things as well, because starting with the pieces helps them to understand how it works, then they are likely to take what they just built apart and try to make it better. I pair imaginative with this trait as curious people tend to find themselves thinking of new ways of doing things or finding unique solutions to problems. We often find ourselves needing to ask how something works, or coming up with new or novel solutions in our field…so I put curiosity as one of my top 3.
The second is perseverance. I feel this is a strong trait of people I see as being successful across many different fields, but also feel it is critical to carry this trait if your field is information security. It is easy to get frustrated in our field just based on the breadth of knowledge it requires. I don’t mean to say you need to know everything, but as my career progressed I found myself leaning on knowledge that wasn’t directly related to security that allowed me to see the bigger picture of things and how what I was doing was going to affect things that I previously wasn’t thinking of. We also need perseverance as we are often beat down and blamed for “IT not working like it should because of security” or being the “team that says no all the time”. I’m not advocating that you take a strong stance each and every time someone challenges you (being stubborn is not the same as perseverance), you need to pick your battles, and when you do you will need to stand your ground. This trait leads me to the last one…where perseverance is required to not give up on something just because it is hard.
Learn how you learn, so that you can teach yourself new things in the future. When I was an undergrad I hadn’t yet learned how I learn best, or better yet, how to teach myself. By the time I was a grad student I had figured it out and learning, and courses in general, became much easier and fun which allowed me to focus on how to apply my newly gained knowledge to both past and future problems I would encounter. I find myself learning all the time just to stay current, so if you’re going to stay current in our field then expect to become a lifelong learner. Yes, I know this also applies to other fields as well, but I feel it is critical in our field given the pace of change. I used to think this was a “young” student’s problem or a generational issue, but over time I found that to be a misconception on my part. This seems to affect all generations equally based on my observations. My advice is generally pretty simple, if you’re not curious or inquisitive and you can’t stick it out through perseverance it is unlikely that you’ll find yourself being a lifelong learner. One thing that I get in the evaluations each and every quarter since I’ve changed my style is that “I can’t believe you said that we should use Google to answer our own questions”…which blows my mind. When I started in this field I had Hacking Exposed and IRC…today’s new students of the field have Google, 100’s of published and unpublished security books, and way more educational resources than ever before. So why not use them to your advantage? Why is being asked to learn something on your own such a bad thing?
To conclude, I realize there are other traits that are required in order to be successful, but I feel that without the three I boiled it down to that the others don’t matter. Finally, I realize that some people who aren’t strong in these three traits will still stay in the field and be satisfied with putting years into the field only to push buttons every day. Which reminds me, I was watching Caddyshack the other day and there’s a line where Ty tells Danny that “the world needs ditch digger too”…relating that to this post I always make it “the world needs firewall admins too” in my mind.
My Password is passwordispassword
In September of this year a large dump, approximately 5 million, of what was claimed to be Google account usernames and passwords was dumped onto the internet. While Google’s own analysis of the dump showed that only 2% of the accounts would have worked to allow access into Google/Gmail accounts (see: http://googleonlinesecurity.blogspot.com/2014/09/cleaning-up-after-password-dumps.html) I still found it interesting to analyze the password dump as it offers a glimpse into how people choose their passwords…I guess I can’t shed the pen tester in me or my love of breaking and analyzing passwords.
In the past (circa 2006-7) I completed a similar analysis on ~100k Active Directory cracked passwords that were harvested through a few pen tests in 3 different industry verticals (energy, oil/gas, and healthcare). The idea was to get a view into not only how people chose their passwords but also to understand how to break them more easily. At the time the only available password dumps and research I could find was being done on passwords from websites (e.g. myspace phishing). I wanted to see how corporate users were choosing passwords and not analyzing how some 12 year old chose a password of “blink182”.
The main take-aways from my research on ~100k corporate passwords were:
- 99% of the passwords were less than 14 characters in length – and a majority were 8 characters in length
- Passwords generally had a root that consisted of a pronounceable (read: dictionary) word, or combination of words, followed by an appendage
- The appendage was:
- A 2 digit combination
- 4 digit dates (from 1900-2007)
- 3 digit combinations
- Special characters or special plus a digit
- The root or pronounceable word was rarely preceded by the appendages I listed above, but in ~5% of the cases the passwords either started with the appendage or were wrapped in appendages
- Through examination of password histories and phishing attacks I was running back then, I noticed that when users are required to change their password they generally change the appendage and not the root (i.e. password01 becomes password02, and so on)
It also became quite obvious as to why the majority of the passwords were 8 characters in length once I reviewed the GPO that was applied to the domain (or users OU) that dictated that the minimum length be 8 characters with complexity enabled. Why a length of 8 and complexity enabled you may ask? Well, likely because Gartner recommended this as a length due to the amount of time brute-forcing an 8 character complex password using CPU-based methods was considered adequate, unless of course we are dealing with LM hashes as was the case in my initial research. GPU-based systems, as we are well aware, have no problems brute-forcing their way through 8 character complex passwords (and this was as of a few years ago).
So, on to the current password dump of Google usernames and passwords. While I realize I discounted research on website passwords earlier I made an assumption here that at some point all of those corporate policies and awareness trainings would make their way into our everyday “password” lives and into our website passwords. Plus, I already had a copy of the plaintext passwords, there were a lot of them, and I didn’t need to spend any time breaking them.
First, some raw numbers and my technique:
- There were just under 5 million passwords in the dump, of which I sampled approximately 20% (1,045,757 to be exact) for analysis. I made the assumption that this would be a statistically relevant sample and the results indicative of analysis of all ~5 million passwords
- I removed all 1-2 character passwords, leaving me with passwords of 3-64 characters in length
- I had to spend some time cleaning up the dump, removing passwords that appeared to be hashes (and not plaintext passwords) as well as removing lines that were obviously mis-prints (i.e. website addresses versus passwords, extra line breaks and the like…)
- Prior to removing duplicate passwords I did some quick counts on both common or funny passwords, and here’s what I found:
- A very small number (~3,700) contained a swear word. I’m not telling you what I searched for, but the reason I did this was I found these to generally have the funniest combinations both in this current analysis as well as the corporate passwords mentioned above
- A smaller than expected number of passwords (~10,500) contained “pass” or “password” in the password
- The use of 1337 and 31337 is still a thing (albeit small) with ~2,500 passwords containing those strings
- Nietzsche may have been correct and God may be dead as ~1,900 passwords contained the word god
- There were 255,284 duplicates which resulted in a final (de-duped) password count of 790,462
Another reason I wanted to complete this analysis was that it gave me a reason to try out the Password Analysis and Cracking Kit (PACK). PACK is a Python-based wordlist (in my case password) analysis script and I would recommend this tool for both password analysis as well as taking a peak into your large wordlists to see if they are valuable or not based on what you’re trying to crack (i.e. 7 character passwords don’t make sense for WPA-PSK breaking). The script not only shows you the length by distribution (which would be trivial in Excel, I know), but it also analyzes the character sets, complexity, and shows what Hashcat masks would work best to break X percentage of the passwords in the list.
Here’s what PACK had to say about my Google sample of 790,462 passwords:
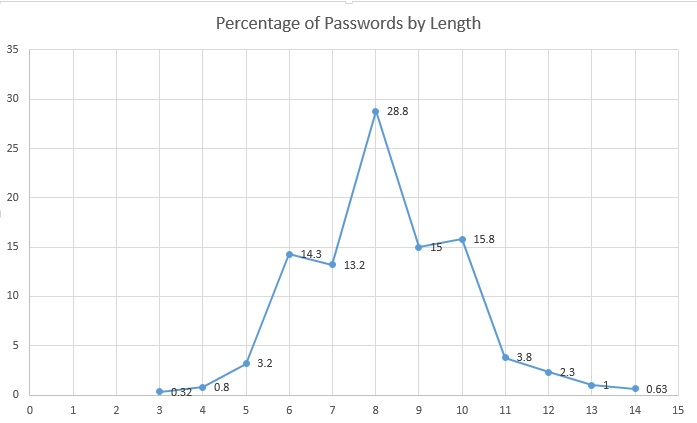
- Length distribution (in the graphic below) showed that the largest percentage of passwords was in the 6-10 character range which is expected. What I didn’t expect was that 8-10 would make up a majority of the passwords by length (~59.6% of all passwords)
- Complexity by percentage was highest for lower alpha-numeric followed by lower alpha-only (~79% of all passwords)
- The simple masks show that a majority of the passwords are a string followed by digit (root + appendage as mentioned above) and a simple string (~66% of all passwords)
- The advanced masks for Hashcat that break the most passwords (~12% of all passwords) are ?l?l?l?l?l?l?l?l and ?l?l?l?l?l?l, which means 12% of the passwords are 6 or 8 character alpha-only passwords
So what did the results show? Well, I think they showed what I thought they would show…passwords that people chose are both predictable and unchanged over the last 7+ years. In addition to my research, KoreLogic Security had a good presentation on password topology histograms from corporate pen tests that showed results that were similar to those above. The one difference that stood out from my research was that I was breaking LM passwords back in 2006-7 so I wasn’t as concerned with case-permutations (I didn’t care where the upper alpha character was as that was trivial to determine if needed), and second, the Google sample I analyzed seemed to favor all lower case roots. For comparison, my top 3 masks and the Kore top 3 masks were:
(Kore* – My Sample)
- ?u?l?l?l?l?l?d?d – ?l?l?l?l?l?l?l?l
- ?u?l?l?l?l?l?l?d?d – ?l?l?l?l?l?l
- ?u?l?l?l?d?d?d?d – ?l?l?l?l?l?l?l?l?l
*Note I’m only using the Kore Fortune 100 sample, the second sample in their set simply added a special character to the last position of the mask.
What this comparison showed was that corporate passwords appear to be more complex but just as long as the passwords people generally choose for websites (i.e. Gmail, Ymail, etc.) for the top 3 masks and that the techniques for breaking non-corporate and corporate passwords may need to be adjusted depending on the target at-hand. What this also showed was that corporate users tend to hover around a few topologies of passwords and my sample showed a more even distribution of masks. For example, the top 3 masks from the Kore presentation represent ~36% of all passwords from the sample and mine represent only ~16%. I’d have to get 10 masks deep to get to 36% of all passwords. It also showed that people tend to choose a path of least resistance to creating a password. Many websites and web services generally do not require password complexity, hence what I believe is driving the higher number of all lower alpha passwords in my sample versus my early research and the more recent Kore research into corporate passwords.
Finally, I’d like to end this with an explanation of the title of the post. While in the “less than a 10th of a percent area of the passwords in my sample”, some interesting passphrases emerged especially in the 20+ character range. Besides “ilovejustinbeiber” I thought the “passwordispassword” password spoke volumes about how users view their passwords…as a hindrance to getting what they want or where they need to go.
Tl;dr – passwords still suck as an authentication mechanism and our users aren’t going to go out of their way to increase security.
Ideas on Asset Criticality Inference (ACI) – Research Notes
General | Deron Grzetich | 22. August, 2014
Asset management is a foundational IT service that many organizations continue to struggle to provide. Worse yet, and from the security perspective, this affects all of the secondary and tertiary services that rely on this foundation such as vulnerability management, security monitoring, analysis, and response to name a few. While it is very rare that an organization has an up-to-date or accurate picture of all of their IT assets, it is even rarer (think rainbow-colored unicorn that pukes Skittles) that an organization has an accurate picture of the criticality of their assets. While some do a decent job when standing up a CMDB of mapping applications to supporting infrastructure and ranking their criticality (although many tend to use a binary critical/not critical ranking), these criticality rankings are statically assigned and if not updated over time may turn stale. Manual re-evaluation of assets and applications in a CMDB is a time-consuming task that many organizations, after the pain of setting up the CMDB in the first iteration, are not willing or likely to make re-certification of assets and criticality rakings a priority…and it is easy to understand why. My other issue is that many CMDBs sometimes take into account the “availability” factor of an asset over the criticality of the assets from a security perspective. For example, it is not uncommon to see a rigorous change management process for assets in the CMDB with a slightly less rigorous (or non-existent) change management process for non-CMDB assets. But I digress…to summarize my problem:
- Asset criticality often does not exist or is assigned upon the asset’s entry into a central tracking mechanism or CMDB
- The effort to manually determine and recertify asset criticality is often so great that manual processes fail or produce inaccurate data
- In order for asset criticality data to be useful we may need near real time views of the criticality that change in concert with the asset’s usage
- Without accurate asset inventories and criticalities we cannot accurately represent overall risk or risk posture of an organization
The impact of inaccurate asset inventories and lack of up-to-date criticality rankings got me thinking that there has to be a better way. Being that I spend a majority of my time in the security monitoring space, and now what seems to be threat intel and security/data analytics space, I kept thinking of possible solutions. The one factor I found to be in common with every possible solution was data. And why not? We used to talk about the problems of “too much data” and how we were drowning in it…so why not use it to infer the critically of assets and to update their critically in an automated fashion. Basically, make the data work for us for a change.
To start I looked for existing solutions but couldn’t find one. Yes, some vendors have pieces of what I was looking for (i.e. identity analytics), but no one vendor had a solution that fit my needs. In general, my thought process was:
- We may be starting with a statically defined criticality rating for certain assets and applications (i.e. CMDB), and I’m fine with that as a starting point
- I need a way to gather and process data that would support, or reject, the statically assigned ratings
- I also need a way to assign ratings to assets outside of what has been statically assigned (i.e. critical assets not included in CMDB)
- The rating system shouldn’t be binary (yes/no) but more flexible and take into account real-world factors such as the type/sensitivity of the data stored or processed, usage, and network accessibility factors
- Assets criticalities could be inferred and updated on a periodic (i.e. monthly) or real-time basis through data collection and processing
- The side-benefit of all of this would also include a more accurate asset inventory and picture that could be used to support everything from IT BAU processes (i.e. license management) and security initiatives (i.e. VM, security monitoring, response, etc.)
These 6 thoughts guided the drafting of a research paper, posted here (http://www.malos-ojos.com/wp-content/uploads/2014/08/DGRZETICH-Ideas-on-Asset-Criticality-Inference.pdf), that I’ve been ever so slowly working on. Keep in mind that the paper is a draft and still a work in progress and attempts to start to solve the problem using data and the idea that we should be able to infer the criticality of an asset based on models and data analytics. I’ve been thinking about this for a while now (the paper was dated 6/26/2013) and even last year attempted to gather a sample data set and to work with the M.S. students from DePaul in the Predicative Analytics concentration to solve but that never came to fruition. Maybe this year…
Operationalizing Threat Data & Intelligence – Putting the Pieces of the Puzzle Together
While this isn’t a post on what threat intelligence is or is not I’d be negligent if I didn’t at least begin to put some scope and context around this term as the focus of this post is on making threat data and intelligence actionable. Not to mention, every vendor and their grandmother is trying to use this phase to sell products and services without fully understanding or defining its meaning.
First, it is important to understand that there is a difference between data and threat intelligence. There are providers of data, which is generally some type of atomic indicator (i.e. IOC) that comes in the form of an IP address, URL, domain, meta data, email addresses or hash. This data, in its least useful form, is a simple listing of indicators without including attribution of the threat actor(s) or campaigns with which they are associated. Some providers include the malware/malware family/RAT that was last associated with the indicator (i.e. Zeus, cryptolocker, PlugX, njRAT, etc.) and the date associated with the last activity. Some other providers focus on telemetry data about the indicator (i.e. who registered the domain, geolocated IP, AS numbers, and so on). Moving up the maturity scale and closer to real intel are providers that track a series of indicators such as IP, domains/subdomains, email addresses and meta data to a campaign and threat actor or group. If we add the atomic indicators plus the tactics (i.e. phishing campaigns that include a weaponized PDF that installs a backdoor that connects to C2 infrastructure associated with a threat actor or group) used by the threat actors we start to build a more holistic view of the threat. Now that we understand tactics, techniques and procedures (TTPs) and capability or our adversaries, we focus on the intent of the actors/groups or personas and how their operations are, or are not, potentially being directed at our organization. The final piece of the equation, which is partially the focus of this post, is understanding how we take these data feeds, enrich them, and then use them in the context of our own organization and move towards providing actual threat intelligence – but that is a post on its own.
Many organizations think that building a threat intelligence capability is a large undertaking. To some extent they are correct in the long term/strategic view for a mature threat intel program that may be years down the road. However, the purpose of this post is to argue that even with just a few data and intel sources we can enable or enhance our current capabilities such as security monitoring/analysis/response and vulnerability management services. I honestly chose these services as they fit nicely in my reference model for a threat monitoring and response program as well as threat intel which is at the center of this reference model. So let’s walk through a few examples…
Enrichment of Vulnerability Data
Vulnerability assessment programs have been around for what seems like forever, but mature vulnerability management programs are few and far between. Why is this? It seems we, as security professionals, are good at buying an assessment technology and running it and that’s about it. What we aren’t very good at is setting up a full cycle vulnerability management program to assign and track vulnerability status throughout the lifecycle. Some of the reasons are due to historical challenges (outlined in more detail in a research paper I posted here: http://goo.gl/yzXB4r) such as poor asset management/ownership information, history of breaking the infrastructure with your scans (real or imagined by IT), or way too many vulnerabilities identified to remediate. Let’s examine that last challenge of having too many vulnerabilities and see if our data and intel feeds can help.
Historically what have security groups done when they were faced with a large number of vulnerabilities? The worst action I’ve seen is to take the raw number of vulnerabilities and present them as a rolling line graph/bar chart over time. This type of reporting does nothing to expose the true risk, which should be one of the main outputs of the vulnerability management program, and infuriates IT by making them look bad. Not to mention these “raw” numbers generally tend to include the low severity vulnerabilities. Do I really care that someone can tell what timezone my laptop is set to? I don’t know about you but I doubt that is going to lead to the next Target breach. Outside of raw numbers, the next type of action usually taken is to assign some remediation order or preference to the assessment results. While a good start, most security teams go into “let’s just look at sev 4 and sev 5 vulnerabilities” mode which may result in what amounts to a still very large list. Enter our threat data…
What if we were able to subscribe to a data feed where the provider tracked current and historical usage of exploits, matched the exploit with the associated vulnerabilities, and hence the required remediation action (i.e. apply patch, change configuration, etc.)? This data, when put into the context of our current set of vulnerabilities, becomes intelligence and allows us prioritize remediation of the vulnerabilities that impose the greatest risk due to their active use in attack kits as well as non 0-day exploits being used by nation state actors. As a side note, among a few vendors there is a myth being spread that most all nation-state attacks utilize 0-days, which I find to be an odd statement given that we are so bad at securing our infrastructure through patch and configuration management that it is likely that an Adobe exploit from 2012 is going to be effective in most environments. But I digress.
So how much does using threat data to prioritize remediation really help the program in reducing risk? In my research paper (here: http://goo.gl/yzXB4r) I noted that limiting to sev 4 and sev 5 as well as using threat data it is possible to reduce the number of systems that require remediation by ~60% and the discrete number of patches that needed to be applied was reduced by ~80%. While one may argue that this may still result in a high number of patches and/or systems requiring treatment I would counter-argue that I’d rather address 39,000 systems versus 100,000 and apply 180 discrete patches over 1000 any day. At least I’m making more manageable chunks of work and the work that I am assigning results in a more meaningful reduction of risk.
Integrating Your Very First Threat Feed – How Special
In addition to creating a reference model for a security monitoring, analysis and response programs (which includes threat intel) I also built out a model for implementing the threat intel service which includes a 4 step flow of: 1. Threat Risk Analysis, 2. Acquisition, 3. Centralization, and 4. Utilization. I’ll detail this model in a future post and the fact that in a mature service there would be a level of automation, but for now I’d like to point out that it is perfectly acceptable to build a threat intel program as a series of iterative steps. By simply performing a threat risk assessment and understanding or defining the data and intel needs an organization should then be able to choose a data or intel provider that is suitable to their goals. Ironically I’ve witnessed a few organizations that went out and procured a feed, or multiple feeds, without understanding how it was going to benefit them or how it would be operationalized…I’ll save those stories for another day. And while I’m not going to cover the differences between finished intel versus indicators/data in this post, it is possible for an organization to procure feeds (open source and commercial feeds) and instrument their network to prevent activity, or at a minimum, detect the presence of the activity.
As an example, let’s say that we have a set of preventive controls in our environment – firewalls, web/email proxies, network-based intrusion prevention systems, and end point controls such as AV, app whitelisting, and host-based firewalls. Let’s also say we have a set of detective controls that includes a log management system and/or security information and event management (SIEM) which is being fed by various network infrastructure components, systems and applications, and our preventive controls mentioned above. For the sake of continuing the example let’s also say that I’m in an industry vertical that performs R&D and would likely be targeted by nation state actors (i.e. this Panda that Kitten) in addition to the standard Crimeware groups and hacktivists. With this understanding I should be able to evaluate and select a threat intel/data provider that could then be used to instrument my network (preventive and detective controls) to highlight activity by these groups. At this point you would start asking yourself if you need a provider that covers all of the type of threat actors/groups, if you need vertical-specific feeds, and if you need to ensure that you have a process to take the feeds and instrument your environment? The answer to all three is likely to be yes.
Continuing with the example, let’s say I selected a provider that provides both analyst-derived/proprietary intel in addition to cultivating widely available open source information. This information should be centralized so that an operator can assess the validity and applicability of the information being shared and determine the course of action on how to integrate this into the preventative and/or detective controls. A simple example of this may be validating the list of known-bad IPs and updating the firewall (network and possibly host-based) with blocks/denies for these destinations. Or, updating the web proxy to block traffic to known bad URLs or domains/sub-domains. One thing that shouldn’t be overlooked here would be that we trigger an alert on this activity for later reporting on the efficacy of our controls and/or the type of activity we are seeing on our network. This type of data is often lacking in many organization and they struggle to create a management-level intel reports that are specific to the organization that highlight the current and historical activity being observed. In addition, we could also take the indicators and implement detection rules in our log management/SIEM to detect and alert on this activity. Again, keep in mind that for an organization just standing up a threat intel service these may be manual processes that have the possibility of being partially automated in a later or more mature version of the service.
As a side note, one thing I’ve noticed from many of the SIEM vendors is how they try to sell everyone on the “intel feeds” that their product has and how they are “already integrated”. The problem I have with this “integration” is that you are receiving the vendor’s feed and not one of your choosing. If SIEM vendors were smart they would not only offer their own feeds but also open up integrations with customer-created feeds that are being generated from their intel program. As it stands today this integration is not as straight-forward as it should be, then again, we also aren’t doing a very good job of standardizing the format of our intel despite STIX/CyBOX/TAXII, OpenIOC, IODEF, etc. and the transfer mechanism (API, JSON, XML, etc.) being around for a while now.
To round out this example, it is also important to note that as we instrument our environment that we track the alerts generated based on our indicators back to the category or type (i.e. nation-state, crimeware, hacktivist, etc.) and if possible track back to the specific origin of the threat (i.e. Ukrainian crimeware groups, Deep Panda, Anonymous, etc.). This is going to be key in monitoring for and reporting on threat activity so we can track historical changes and better predict future activity. We can also use this information to re-evaluate our control set as we map the attacks by kind/type/vector and effectiveness (i.e. was the attack blocked at delivery) or the in-effectiveness (i.e. was a system compromised and only detected through monitoring) and map these against the kill chain. This type of information translates into both overall security architecture and funding requests very well.
In Summary
While this is a new and seemingly complex area for information security professionals it really isn’t that difficult to get started. This post highlighted only a few simple examples and there are many more that could be part of your phase 1 deployment of a threat intel service. My only parting advice would be to make sure you have a strategy and mission statement for the service, determine your threat landscape, define what you need out of your feeds and acquire them, centralize the information and utilize it by instrumenting and monitoring your environment. While some of the vendors in this space have great sales pitches and even really cool logos, you had better understand your requirements (and limitations) prior to scheduling a bunch of vendor demos.
Who likes dependencies anyway??? Not me…so here is a shell script to get Cuckoo Sandbox v1.1 installed
General | Deron Grzetich | 23. June, 2014
I realized that I was spending an inordinate amount of time when rebuilding Cuckoo Sandbox (http://cuckoosandbox.org) in my home lab just because I was starting from a fresh Ubuntu install which does not ship with all of the dependencies and packages that are required by Cuckoo. I also break this system quite often and in such specular ways that the only recovery mechanism is to rebuild the system from the OS up. This, unfortunately, also leads back to spending way too much time post-OS install in rebuilding Cuckoo. There has to be a better way…and so there is using a shell script I wrote to get me up and running in no time after a rebuild.
So what do I need to run this script?
The script (located here: cuckoo_install – right-click and save as, rename to .sh) assumes you have a base install of Ubuntu 12.04LTS and that you have updated through an apt-get update and an apt-get dist-upgrade. It was also created to work specifically for Cuckoo Sandbox v1.1. Beyond that you’re on your own to set networking and the user accounts as you see fit. In my case I use the account created during OS install for everything on this system and I have a physically and logically segmented network just for the sandbox and the virtual machines used to detonate the malware. These systems are directly connected to the internet and sit behind a Cisco ASA which is logging all accepts and denies to a Splunk instance and the connection is tapped using a VSS 12×4 distributed tap and the traffic is captured using the free version of NetWitness Investigator. I’m also running a VM instance of INetSim (http://www.inetsim.org) that supplies DNS, FTP, and other services that may be required by the malware (i.e. through faking a DNS response to point the malware to a system I control).
What happens when I run the script?
Assuming your base Ubuntu system has connectivity to the internet it will proceed to download and install all of the required dependencies and packages required to run Cuckoo Sandbox v1.1 (again, this assumes you’re on 12.04LTS as a base OS). There is a built-in check at the start that will verify your version that will error out if you’re on something other than 12.04LTS. If you think this will work even if you’re not on 12.04LTS you can, at your own risk, comment out this section and force the script to run. The script runs in sections and requires that you hit enter before proceeding to the next section. I put this in so you could review the status of a section (i.e. no errors) before continuing on to the next section of the script. If you find that annoying simply comment out all of the “read” commands in the script and it will run start to end, however it becomes difficult to identify any install errors given the length of the output. Other than that the script will install what is required for Cuckoo, and after running you can address and errors or issues with the installed components to ensure everything is installed correctly.
What do I need to do following the script to get Cuckoo up and running?
This is going to be highly dependent on your individual setup, however you need to get your virtual machines built and/or transferred into VirtualBox and set the snapshots that will be used (plenty of good info on the net on this step such as http://santi-bassett.blogspot.com/2013/01/installing-cuckoo-sandbox-on-virtualbox.html). You also need to add your user account to the virtualbox group, download the malware.py file if you plan on using Volatility, and setup your network for your particular needs.
Can I modify the script and/or what if it doesn’t work?
I’m posting this script as-is. It works for my needs in my lab environment which may not be the same as yours. Feel free to mod it as required, however all I ask is if you make significant improvements to the script that you share it back to the community. I’m not going to actively maintain the script or make modifications in the future as this is a one shot deal (I have a $dayjob that actually pays the bills).
Note: If you’re new to Cuckoo or Ubuntu I’d actually recommend trying a manual install if you have time. I realized I learned quite a lot about the required packages and how the system functions when I struggled to get Cuckoo up and running a few years ago. It makes troubleshooting issues I encounter now much easier.
Research paper on Snort rule development for the major fault attack on Allen Bradley MicroLogix 1400 controllers
General | Deron Grzetich | 12. September, 2013
As part of a course I took last quarter at DePaul University on critical infrastructure security I drew the straw on one of our group labs which required that we write a Snort signature for an attack on the Allen Bradley MicroLogix 1400 series controllers. The attack was written by Matt Luallen of Cybati in September of last year for Metasploit which sets a bit on a data file on the controller which indicates to the controller that there is a major logical fault. This attack stops the running program on the controller and must be manually cleared (either through physical interaction with the controller or by clearing the fault using the RSMicroLogix application).
The results of this research project will likely be published in the future in a more formal fashion, but until then I wanted to post a sneak peek at the report for those who may be interested. Note that I wrote this a few months ago and held off on publishing it as it was being copy edited for publication. As I assume that process had died I am left with no choice but to publish this work…no sense in holding on to something to could be of value to someone else.
A link to the PDF is here.